Details
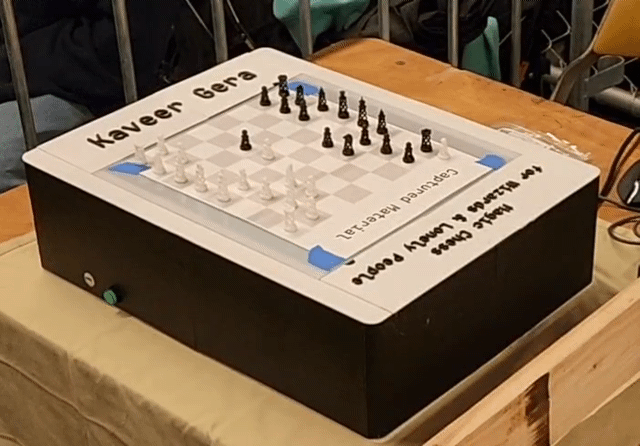
Chess is a tactile game, and that tactility is part of what makes it special. I wanted to create a way to play chess against a computer while preserving the tactility that gives chess its charm, which led to Magic Chess (for Wizards & Lonely People). Another goal of mine was to make it sleek and self-contained so that the user couldn't see any moving parts.
I liked the combination of different skills required for the project: prototyping, CAD, electronics, fabrication, and programming. I’m not the first person to build a self-playing chessboard; there are entire companies that build and sell automatic chessboards, and other people have made detailed guides on how they built theirs. However, I wanted to see if I could navigate the entire process myself, so I deliberately didn’t look at any existing guides.
Getting Started
First, I conceptualized a basic plan for the board. I thought the most straightforward way to move a chess piece precisely and consistently without touching would be by moving a magnet under the board surface. I elected to use an electromagnet instead of a permanent magnet to eschew a degree of freedom, since an electromagnet can be turned on and off instead of needing to move it upwards and downwards to control the magnetic field affecting the pieces.
To move the electromagnet in the X- and Y-dimensions, I would need a gantry system. As opposed to building my own gantry system, I decided to repurpose an existing gantry from a 3D printer, which would save development time and be more reliable. Luckily for me, 3D printer extruder systems tend to fail before the gantry systems, so I could harvest the gantry system from an old broken printer. Most “bed-slinger” 3D printers move the bed in the Y-axis and link the X- and Z-axes together. The Z-axis is usually driven using a lead screw, which would be much too slow for moving chess pieces. I found and purchased an old 3D printer in my area which moved its bed in the Z-axis and moved its extruder in the X- and Y- axes.
Frame and Electronics
I disassembled the 3D printer to isolate the gantry system, which uses two stepper motors to move the gantry in the two dimensions. I built an initial prototype frame out of cardboard to check the dimensions of the gantry and then built a second prototype out of 2x4 lumber, measuring the required frame dimensions, hole depths, and hole placements to mount the gantry system and the Y-axis stepper motor and limit switch.
With a rudimentary frame for the gantry built, it was time to figure out how to control it. I powered the stepper motors using the power supply from the disassembled 3D printer (which was overkill but functional). I experimented with using the 3D printer control board to control the gantry system because it was previously connected and already had all the necessary control hardware, but it kept panicking about the fact that I had disconnected most of its parts. I considered working out how to modify the firmware on the board to disable the errors and extraneous functionality because it would have allowed me to simply transmit g-code to the board, but, after exploring it, I decided to connect a different controller directly to the gantry and build my own framework for moving the carriage in 2D space. I used an Arduino Uno and a motor shield to connect to the two stepper motors which control the gantry and the two limit switches.
Controlling the Gantry
With the preliminary electronics connected, I set out writing the code to control the gantry movement. First, I created a bounds detection routine to ensure the carriage wouldn’t try to exceed the bounds of the gantry system and rip itself apart. When the program starts, it initiates a homing sequence, which moves each motor slowly toward the edge of the axis until it contacts the limit switch. The program then knows the carriage is in the top left corner. The program keeps track of any movement commands in the future, so the controller knows if a command would cause it to exceed the bounds of the frame. This also allows me to give the controller absolute movement commands instead of only commands to move relative to its current position.
Electromagnet!
Now that basic movement was working, I decided to focus on finding a suitable electromagnet. This part of the project took a lot of time researching datasheets and listings for different electromagnets. I needed to find an electromagnet that had a magnetic field powerful enough to reach the pieces through the board and move them. The problem was that most electromagnets that are powerful enough are wider than the chess pieces. The chess pieces must be very precisely half the width of the squares on the chess board so they can move in between other pieces. If the electromagnet was any wider than the piece, then when one piece moved in between other pieces, the other pieces would be picked up by the electromagnet and dragged along with it.
I experimented with several different sizes of electromagnets and tested extending the center of the electromagnet or tilting it to narrow the magnetic field, among other ideas. I crudely analyzed the strengths of the electromagnets by attaching a bag to a metal object held by the electromagnet and filling the bag with progressively heavier dumbbells until the bag became too heavy and fell (onto my foot, usually). The best candidate ended up being a hard-to-find powerful electromagnet that was the same width as the pieces. The Arduino can’t output enough power for the electromagnet, so I used a 5-volt relay to allow the Arduino output to control the electromagnet state. The electromagnet ran on 24 volts unlike the 12 volts used by the other electronics, but I added a 12V to 24V step-up converter so everything could run on one power supply.
Chess Pieces
As I was testing the electromagnets, I was also iterating on chess piece designs. First, I tried adding cavities to the bottoms of the chess pieces and filling them with iron filings, but the magnetic field wasn’t strong enough to move the pieces (and the iron filings were nightmarish to clean up). Next, I tried hot gluing steel nuts to the bottoms of the pieces, which was much less messy and worked well on thin board surfaces. However, it wasn’t very reliable with any distance thicker than a piece of paper between the electromagnet and the pieces. The solution I settled on was embedding 3mm diameter neodymium permanent magnets inside the pieces. I added an internal cavity to the pieces in CAD and programmed the 3D printer (that I hadn’t ripped apart to turn into a chessboard) to pause partway through the print. I added the permanent magnets and then finished the print, creating effective pieces with embedded magnets that can’t fall out.
On a few occasions, I unintentionally placed the magnets upside-down inside one of the pieces. I found out during testing when the board tried to move the piece and instead threw it upwards! In a future upgrade, I may add the electronics to programmatically reverse the polarity of the electromagnet, which would allow the board to topple its own king when faced with a checkmate.
While testing the electromagnets and chess pieces, I also tested various board surface materials and thicknesses. I settled on 0.0625 inch thick polycarbonate because it is thin enough that the pieces can be reached by the magnetic field, and it doesn’t interfere with the magnets.
Enclosure CAD
I started designing the next iteration of the enclosure, which would be much less crude than the wooden prototype frame. I spent hours meticulously reproducing the entire gantry, axles, and carriage in CAD. I modeled essentially every part of the project, including the power supply, stepper motors, Arduino, relay, step-up converter, electromagnet, power input and power switch, and board surface.
The gantry needs room to move, so it takes up most of the space inside the enclosure, leaving little clearance to fit everything else inside. Now that everything was in CAD, I could rearrange components to ensure everything would fit neatly and efficiently inside the enclosure. I designed a custom mounting bracket to attach the electromagnet to the carriage at the correct distance from the board while allowing for proper cable management. I also designed mounting points for every component into the interior of the enclosure to hold everything in place. The full enclosure was too large to fit in the bed of the 3D printer, so I split it into quadrants, printed the parts separately, and used dovetails to reconnect them. The top of the enclosure is flat with supports to hold the board surface in place. Small cutouts allow for easy removal of the board surface to service or display the internals.
Code
I added another layer to the code on the Arduino to allow the Arduino to calculate the positions of the squares on the board in motor steps, so that it could move to the appropriate square when given a square coordinate (such as e2). With the electromagnet state controllable via the relay, I added a function to move a piece from one square to another by moving to the source square, energizing the electromagnet, moving to the destination square, and deactivating the electromagnet. Next, I wrote a simple algorithm to avoid bumping into other pieces on the board by moving the piece along the edges of the squares. I also added the ability to handle castling and, when capturing a piece, move the captured piece off the board, made possible by storing a map of the current board position.
I designed the code to implement the Universal Chess Interface (UCI), which is the standard format chess engines and Graphical User Interfaces (GUIs) use to talk to each other. The chessboard would act as a GUI, showing moves while querying a separate engine for its output. I experimented with running a very simple chess engine on the Arduino, which is technically possible, but I found it was too slow and incompetent for this use case. Instead, I wrote a simple Python program that runs on my computer: it runs the chess engine and sends the engine output to the Arduino via Serial (over USB) and vice versa. Because the chessboard implements the UCI, virtually any chess engine can be used with the chessboard. With the engine connected, I had a functional self-playing chessboard!
Future
In the future, I may switch the Arduino to a Raspberry Pi in order to run everything on one chipset instead of two, but that will require a full code rewrite. I’m contemplating adding drawing functionality as well. I’ve had a great time showing the chessboard to people and hearing their thoughts and ideas.
There were many other research and experimental tangents along the way. This page is more of a personal account than a comprehensive guide, but if you’re building your own magic chessboard (or you’re handing out internships) and have a question, feel free to email me.